You have probably heard the phrase “above the fold” when it comes to newspapers, right? In the “olden days” when we relied on newspapers to give us information about what was happening in the world, the most important stories were above the fold of the newspaper because that top half of the newspaper is typically the part that most people read first.
 newspaper image via shutterstock
Did you know that Facebook has an “above the fold,” too?
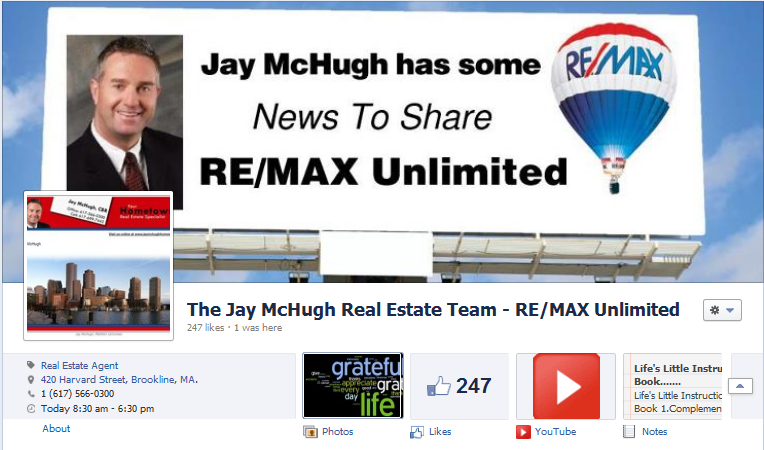
Right underneath your Facebook Timeline header photo there are four boxes. These boxes might share your photos, recent check-ins, friend count, subscription counts, or any other host of apps you may have downloaded to your Facebook page. In fact, there are typically more than four boxes.
If you scroll all the way to the end of the last box, there is an arrow you can click on to see other boxes. However, it is the first four boxes that the world will see when they land on your personal or business page. These four boxes are your “above the fold,” and I’m here to tell you that if you are properly incorporating video into your real estate business, then your YouTube channel needs to be one of those “above the fold” boxes.
Posting a link to your video tour or community video on Facebook is all well and good, but as time passes and as you and others post to your page, your video links get pushed down the timeline. By having your YouTube channel “above the fold,” people can easily navigate to your videos whenever they land on your page. Here’s how to do that.
While on your Facebook home page go to the search bar at the top and type in YouTube for Pages. There are a handful of apps that will offer you the same result, but for this post, I’m using YouTube for Pages. Click on the app and it will walk you through the process.
1. Choose which Facebook page you want to have a YouTube box on.
You can display it on your personal Facebook page or on your business page. You can display it on more than one by duplicating this process.
2. Click the button that says Go To App.
3. Enter your company name and phone number and agree to the terms of service.
4. Set up your YouTube channel.
There are a couple things you’ll want to note here. First, I typically choose to “Hide Related Videos” because I don’t want other people’s content on my page. As well, you’ll have to decide if you want to have your YouTube content automatically posted to your wall. In other words, if you upload a video to YouTube do you want it automatically posting a link on your Facebook wall?
If all you are uploading is real estate stuff, then this isn’t a problem but if you are also uploading personal videos of any type to your YouTube channel you may elect to not have every YouTube video automatically upload to your wall.
By the way, I’d recommend that you have two YouTube channels, one for personal and one for business so to avoid any problems here.
Last, you need to choose which video you want featured on your YouTube page. This is the video that will show at the top when people click on your YouTube box. You can always have it display your most recent video, or if you click on the Featured Video box it will allow you to choose from all of your YouTube content. Save changes and you are done. Don’t worry, you can get back to this page if you want to change your settings later.
5. Above the fold.
For most of you, the YouTube box will not automatically appear “above the fold” in those first four boxes under your Facebook Timeline photo. To move YouTube into one of those four coveted spots, just hover your mouse over one of those boxes and the little pencil will appear in the upper right-hand corner of the box. It will allow you to swap the position of that box with your YouTube box so that YouTube is now “above the fold” on your Facebook page.
6. This is how your page should look.
7. Editing:
If you want to make changes to your YouTube page, simply click on your YouTube box and you’ll see an orange button at the top that says “Edit Tab Settings” — this will take you back to the page where you set up your preferences.


